
LMLM Crochet
Crochet Amigurumi Dachshund Pattern

Thanks to Fonzie for being my model and muse and thanks to Jen for the request.
Skill Level: Easy/Intermediate. As long as you can make a magic ring/circle and work single crochets in rounds, increase, decrease and stitch together, then you’ll be fine!
Yarn: Double Knit Special by Stylecraft in Walnut (1054) and Camel (1420) and some white and black in scrap DK yarn. You will also need another colour yarn for the collar, but again, it will just be a small amount and can be in a colour of your choice.
Feel free to use any yarn type as long as you use the correct hook size for that yarn and expect that the results will vary slightly from mine.


Other materials needed: Scissors, yarn needle for sewing together, toy stuffing and a stitch marker (unless you prefer to count).
Hook: 3.75mm. Again, use the hook that fits the yarn. A yarn hook suggestion is normally written on the yarn label.
I will be using US terminology even though I am from the UK because I was taught how to crochet by some lovely American people on YouTube. If you have trouble understanding US terminology, I have included a stitch conversion chart below.

The Pattern
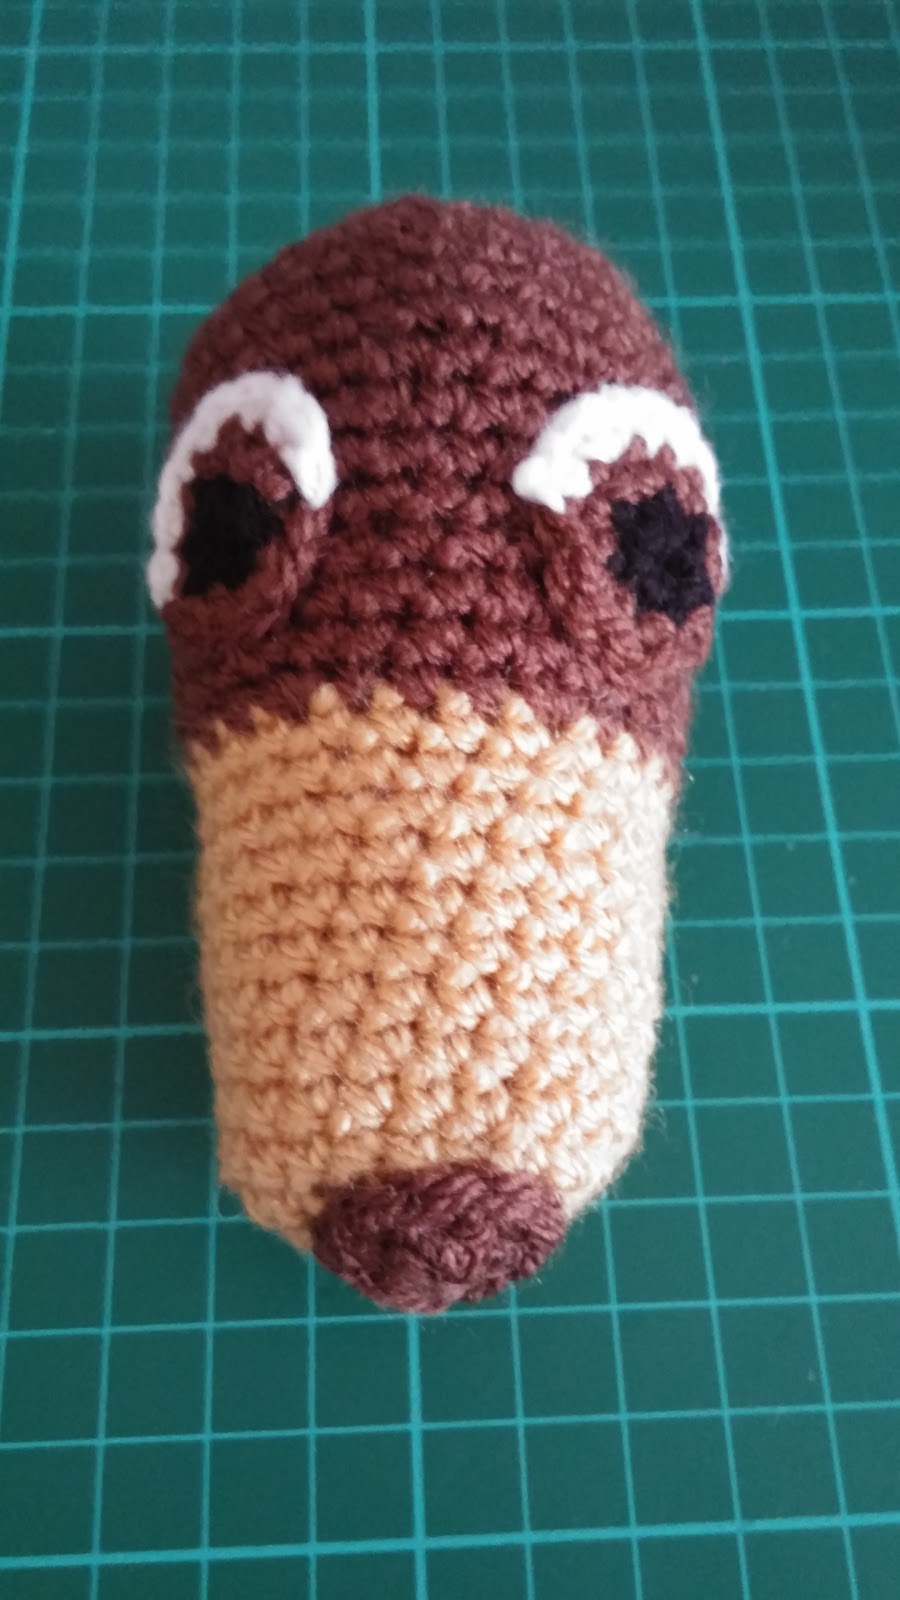
Head
Starting from the muzzle at the front of the head using camel/light brown colour yarn.
Round 1: form a magic ring and make 6 sc in the ring (6 sts).
Round 2 (inc): (Sc2inc) 6 times (12 sts).
Round 3 (inc): (Sc2inc, 1 sc) 6 times (18 sts).
Round 4 (inc): (Sc2inc, 2 sc) 6 times (24 sts).
Rounds 5-14: Sc in each sc around. (You can use your stitch marker here to keep count of your rounds).
Join walnut/dark brown colour yarn.
Round 15 (inc): (Sc2inc, 3 sc) 6 times (30 sts).
Rounds 16-19: Sc in each sc around (use stitch marker, if needed).
Round 20 (inc): (Sc2inc, 4 sc) 6 times (36 sts).
Rounds 21-25: Sc in each sc around (use stitch marker, if needed).
Round 26 (dec): (Sc2dec, 4 sc) 6 times (30 sts).
Round 27: Sc in each sc around.
Start stuffing the head firmly and add stuffing as the head grows.
Round 28 (dec): (Sc2dec, 3 sc) 6 times (24 sts).
Round 29: Sc in each sc around.
Round 30 (dec): (Sc2dec, 2 sc) 6 times (18 sts).
Round 29 (dec): (Sc2dec, 1 sc) 6 times (12 sts).
Slip stitch into the next single crochet and cut off leaving a long length of yarn to sew up. Make sure you have enough stuffing then sew up the opening at the back of the head by going into each stitch with your yarn needle and then pulling tight. Hide any yarn tails inside the head and cut off any excess.
Nose
Using walnut/dark brown colour yarn.
Round 1: Form a magic ring and make 6 sc in the ring (6 sts).
Round 2 (inc): (Sc2inc, 1 sc) 3 times (9 sts).
Slip stitch into the next single crochet and cut off leaving a long length of yarn to sew to the front of the head, just above the original magic ring you made in order to create the muzzle.
Lips
Using walnut/dark brown colour yarn.
Just under the nose, sew into the head then come out just before the yarn colour changes, go back inside the head again and sew back up to the starting point. Go back inside the head again and come out at the opposite side of the head and sew back up to the starting point again.
(These directions are probably quite difficult to understand so it is really just best if you copy the photo!)
Eyes (make 2)
Starting with black colour yarn.
Round 1: Form a magic ring and make 6 sc in the ring (6 sts).
Join walnut/dark brown colour yarn.
Round 2 (inc): (Sc2inc) 6 times (12 sts).
Join white colour yarn.
Round 3 (inc): (Sc2inc, 1 sc) 3 times (9 sts). This will give you a white surround over half the eyes (see photos).
Slip stitch into the next single crochet and cut off leaving a long length of yarn to sew to the top sides of the head. The eyes should be sewn on all the way around just above the colour change on the head (see photos).
Ears (make 2)
Using walnut/dark brown colour yarn. 
Round 1: Form a magic ring and make 6 sc in the ring (6 sts).
Round 2 (inc): (Sc2inc) 6 times (12 sts).
Round 3 (inc): (Sc2inc, 1 sc) 6 times (18 sts).
Round 4 (inc): (Sc2inc, 2 sc) 6 times (24 sts).
Round 5: Sc in each sc around.
Round 6 (inc): (Sc2in, 3 sc) 6 times (30 sts).
Round 7 (inc): (Sc2in, 4 sc) 6 times (36 sts). 
Round 8 (inc): (Sc2in, 5 sc) 6 times (42 sts).
Round 9 (inc): (Sc2in, 6 sc) 6 times (48 sts).
Round 10: chain 1, fold the circle in half and sc through both sides at once to close the circle and turn it into a semi-circle. Slip stitch and fasten off and leave a long length of yarn to sew the ear to the side of the head - just above the eye (see photos).
Body
Using walnut/dark brown colour yarn. Starting from the tail end.
Round 1: Form a magic ring and make 6 sc in the ring (6 sts).
Round 2 (inc): (Sc2inc) 6 times (12 sts).
Round 3 (inc): (Sc2inc, 1 sc) 6 times (18 sts).
Round 4 (inc): (Sc2inc, 2 sc) 6 times (24 sts).
Round 5 (inc): (Sc2in, 3 sc) 6 times (30 sts). 
Round 6 (inc): (Sc2in, 4 sc) 6 times (36 sts).
Round 7 (inc): (Sc2in, 5 sc) 6 times (42 sts).
Round 8 (inc): (Sc2in, 6 sc) 6 times (48 sts).
Rounds 9-42: Sc in each sc around. I would definitely use the stitch marker in this case because you have a lot of rounds to keep track of. Alternatively, you can count the rounds every now and then to check that you have the right amount.
Begin to shape the front of the body and the neck. This section is worked in rows.
Row 1 (dec): 1 sc in the next 18 sc, (sc2dec) twice, 1 sc in the next 18 sc, turn.
Row 2: chain 1, 1 sc in the next 38 sc, turn.
Row 3 (dec): chain 1, 1 sc in the next 17 sc, (sc2dec) twice, 1 sc in the next 17 sc, turn.
Row 4: chain 1, 1 sc in the next 36 sc, turn.
Row 5 (dec): chain 1, 1 sc in the next 16 sc, (sc2dec) twice, 1 sc in the next 16 sc, turn. 
Row 6: chain 1, 1 sc in the next 34 sc, turn.
Row 7 (dec): chain 1, 1 sc in the next 15 sc, (sc2dec) twice, 1 sc in the next 15 sc, turn.
Row 8: chain 1, 1 sc in the next 32 sc, turn.
Row 9 (dec): chain 1, 1 sc in the next 14 sc, (sc2dec) twice, 1 sc in the next 14 sc, turn.
Row 10: chain 1, 1 sc in the next 30 sc, turn.
Row 11 (dec): chain 1, 1 sc in the next 13 sc, (sc2dec) twice, 1 sc in the next 13 sc, turn.
Row 12: chain 1, 1 sc in the next 28 sc, turn.
Begin to stuff the body.
Row 13: chain 1, fold work in half and slip stitch into the back loops only of both sides until the front side of the body is closed up. Fasten off and sew in loose tail. You will have an opening left for the neck. Add more stuffing to the body until it is firm.
Neck
 Join walnut/dark brown colour yarn onto the neck opening at one of the corners. Now, your neck may vary from mine depending on how many stitches you can get from the opening. I would use this part as a guideline. As long as you create a neck that is wide enough to support the head and high enough to look realistic then you will succeed. Otherwise, see the directions for my method.
Round 1-4: 1 sc in each sc around.
Round 5 (dec): sc2dec 9 sc, sc2dec, 9 sc, sc2dec, 6 sc (27 sts).
Round 6: 1 sc in each sc around.
Round 7 (dec): sc2dec 8 sc, sc2dec, 8 sc, sc2dec, 5 sc (24 sts).
Round 8: 1 sc in each sc around.
Slip stitch into the next stitch and fasten off. Leave enough yarn to sew the head onto the neck. Stuff the neck and sew on the head.
Legs (make 4)
Starting with the paws using camel/light brown yarn.
Round 1: Form a magic ring and make 6 sc in the ring (6 sts).
Round 2 (inc): (Sc2inc) 6 times (12 sts).
Round 3 (inc): (Sc2inc, 1 sc) 6 times (18 sts).
Round 4 (inc): (Sc2inc, 2 sc) 6 times (24 sts).
Round 5: 1 sc in the back loops of each sc around. This will create the flat base of the paw.
Round 6: 1 sc in each sc around.
Round 7 (dec): Sc in next 6 sc, (sc2dec) 6 times, sc in next 6 sc.
Round 8: 1 sc in each sc around (18 sts).
Join walnut/dark brown colour yarn.
Rounds 9-15: 1 sc in each sc around (18 sts).
Stuff the legs firmly.
Slip stitch and fasten off. Leave a long length of yarn to sew the legs to the underside of the body; two at the front and two at the back.
Tail 
Using walnut/dark brown colour yarn.
Round 1: Form a magic ring and make 8 sc in the ring (8 sts).
Round 2-19: 1 sc in each sc around.
Stuff the tail using a knitting needle or the end of your scissors to push the stuffing down.
Round 20: Chain 1, flatten the opening of the tail and sc either side together. Slip stitch and fasten off. Leave a length of yarn and sew the tail to the back of the body.
Collar
Row 1: Chain 25.
Row 2: Sc to the end (24 sts), turn
Row 3: Chain 1, sc to the end (24 sts), chain 4 and join to the other side of the collar to form a loop for the button hole.
 Sew a button on to the other side.
Embroider small anchors along the collar in white yarn.
All Done!


Thank you, Fonzie Stephens.
Comments
Post a Comment